
A broken or malfunctioning laptop screen can be a frustrating experience, but fortunately, it can be easily resolved through a replacement. Replacement of the Laptop screen is a practical and cost-effective solution that allows you to restore the visual functionality of your device. In this comprehensive guide, we will discuss the process of laptop screen replacement.
I. Diagnosing Screen Issues:
Identifying the Problem Before proceeding with a screen replacement, it is essential to diagnose the issue accurately. Common screen problems include cracked screens, flickering displays, or no display at all. By identifying the specific issue, you can determine if a screen replacement is the appropriate solution.
II. Researching Compatible Replacement Screens:
Finding the Right Fit To ensure a successful screen renewal, it is crucial to research and find a compatible replacement screen for your laptop model. Consult the manufacturer’s specifications or documentation to determine the exact screen model or part number. Look for reputable suppliers or online retailers that offer compatible replacement screens that match your laptop’s specifications.
III. Preparing for the Replacement:
Gathering the Tools Before proceeding with the replacement, gather the necessary tools. Common tools required for a screen replacement include a screwdriver set, pry tools, an anti-static wrist strap, and a clean, lint-free cloth. Having these tools on hand will enable a smooth and efficient replacement process.
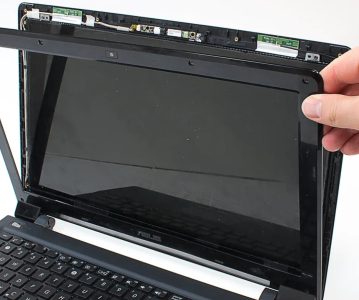
IV. Step-by-Step Installation:
Performing the Replacement Performing the screen renewal requires careful attention to detail and following a step-by-step process. Each laptop model may have specific nuances, but the general steps include removing the bezel or frame, disconnecting the video cable and other connectors, unscrewing and removing the old screen, and installing the new screen. Refer to manufacturer guides, online tutorials, or user forums specific to your laptop model for detailed instructions and visual aids.
V. Testing and Troubleshooting:
Ensuring Proper Functionality After completing the screen replacement, it is crucial to test the new screen for proper functionality. Reconnect the necessary cables, power on the laptop, and observe the display for any abnormalities. Check for proper colour accuracy, resolution, brightness, and touch functionality if applicable. If any issues arise, troubleshoot by rechecking connections, ensuring proper cable seating, and confirming compatibility.
Conclusion:
Replacement of the Laptop screen is a practical solution for resolving broken or malfunctioning screens and restoring the functionality of your device. By understanding the different types of laptop screens, assessing compatibility, following safety precautions, and carefully following the step-by-step replacement process, you can successfully replace your laptop screen.